

How to Host an ARMA 3 Dedicated Server - A Step by Step Guide
There are hundreds of great ARMA 3 server hosts out there, but you may not even need one. If you want to get a better return for your money, you should consider hosting ARMA 3 on your own server. This guide will help you get an ARMA server up and running from scratch. Let’s dive right in!
Intro
After playing ARMA 3 for a little while, you may be realizing that current servers don’t fit your needs, or won’t install the mods you require. Having your own dedicated Arma server will let you run the missions you like, control your ping, and build a community. This guide will cover how to set up a dedicated ARMA 3 server, both via a Virtual Private Server (VPS) and on your own PC.
First, it’s worth emphasizing that a VPS is often the best choice if you’re planning to get serious. Though it’s tempting to go it alone, hardware requirements for large servers may add up to more than hosting fees, while having less uptime and dedicated support staff. They can be surprisingly affordable while offering you the exact same degree of customization and freedom.
Purchasing and Setting up a VPS
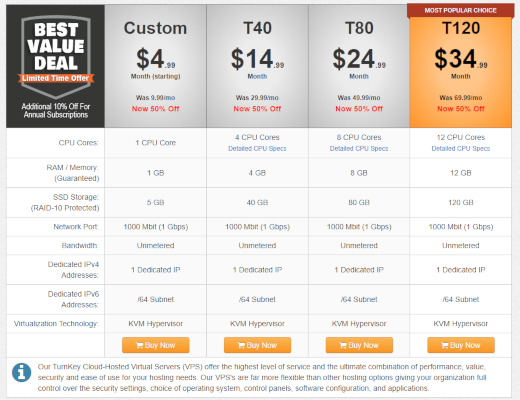
Our recommended VPS provider if your located in the US is TurnKey internet, who provides a number of different specification machines with great uptime, gigabit internet speeds, and reasonable prices. For the purpose of the guide, we’re configuring our dedicated ARMA server on its most popular T120 subscription, which provides 12 CPU cores, 120GB RAID-10 storage, and 12GB RAM for $34.99 per month. Cheaper plans are available to target lower population servers.
If you need a server outside the US or in another city, we'd recommend one of A2 Hosting, Hostwinds Managed VPS or Unmanaged VPS. The process should be similar.
On TurnKey Internet's checkout page, users will see an option to choose the server location, with a choice of New York or California. You’ll also be able to choose the starting OS, which includes anything from Windows Server to CentOS 7, Ubuntu Server, Linux Mint, Ubuntu Desktop, or a custom ISO. Here, server specs can also be adjusted in a modular fashion.
After purchase, users will receive an email with details for their client area. Under products and services, you can click the relevant VPS for more detail. On the left sidebar, users will note a link to their VPS control panel, alongside a username and password. Logging in with the correct details will present users with a variety of maintenance features, from restart, shutdown, and boot, to the ability to change the OS, reconfigure networking, and view the server via a web client.
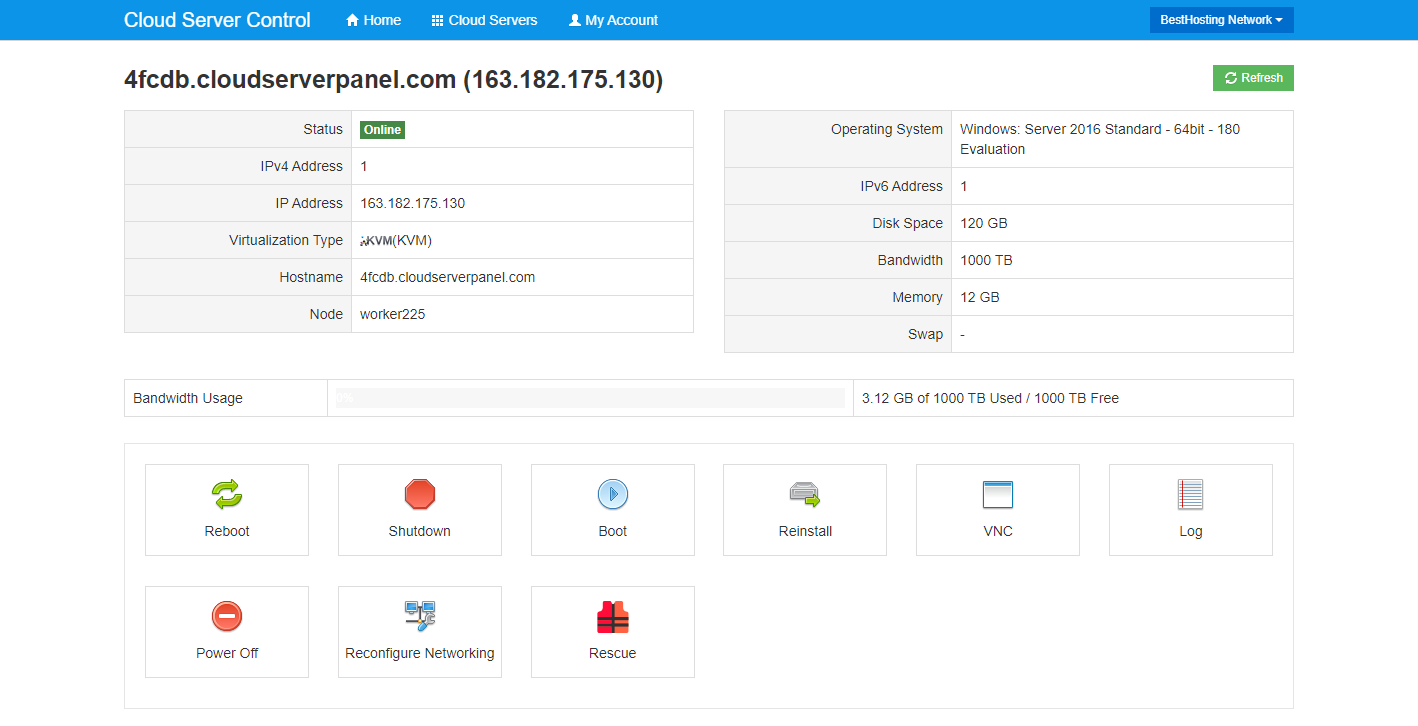
As well as through the web, you can access the server via Windows’ built-in Remote Desktop tool. Simply enter the IP address listed in the Cloud Server Control, using Administrator for a Windows host and Root for Linux. The root password can be found under the ‘Additional Information’ tab of the product in the TurnKey internet Client Area.
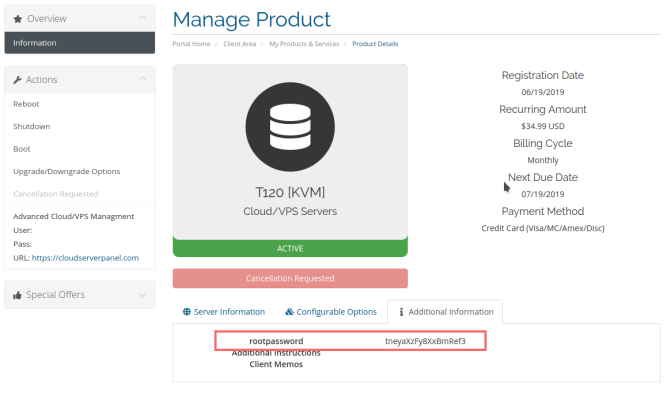
A word of warning: DO NOT share the root password with anyone. it grants full control of the server to anyone who has it.
You can now use your server as you would a normal PC.
Creating a dedicated Arma 3 server in Windows
Whether you’re creating an Arma 3 server on a dedicated server or your home PC, the process is the same. However, it’s worth noting that either way, you must ensure your machine and connection are powerful enough to support players. Ignore the system requirements and your players will experience lag, crashes, and other issues that will stop them coming back.
System Requirements
As far as we can tell, Bohemia Interactive has not published any official specifications for running an Arma 3 server. This is likely because the power you need depends greatly on the number of players, any mods you have installed, configuration, number of AI, and missions.
Thankfully, the folks at ServerMania have done some testing, as has Arma 3 community 16AA. The bottom line is that you’ll want a CPU with fast single-threaded performance to maintain a high server FPS. This is because Arma 3 doesn’t make proper use of multi-threading. As a result, you only really need a dual-core CPU.
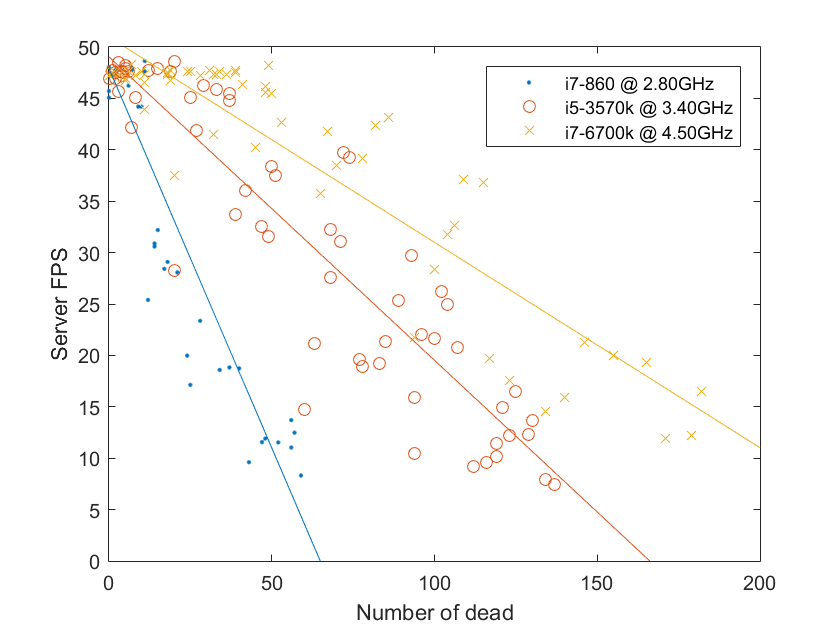
Source: 16AA
The minimum specifications ServerMania recommends are:
- CPU: 2.4GHz dual-core processor
- RAM: 2GB
- HDD: 32GB
- OS: Linux/Windows Server 2008 (or better)
Though that isn’t particularly demanding, it again depends on your use case. To maintain a steady FPS with many bots or players, the ideal setup is a dual-core CPU with at least 3 GHz+ clock speeds, and at least 4 GB of RAM. When it comes to RAM, 1 GB for every ten players is a good general guide, but you’ll start to see diminishing returns. Some admins report a smoother experience for players if they have a fast SSD. Generally, it may be worth trying a few VPS solutions with different specs before committing to any hardware purchases.
Network speeds are another important factor to consider, and harder to pin down. This one depends almost entirely on the number of players. Outside of Arma, server admins tend to allocate 1Mbps up and down for each player. Requirements in this regard are incredibly hard to estimate, but you’ll likely want 100 Mbps up and down for a small to medium server, and up to 1Gbps for a large one. Most VPS’ come with gigabit connections, so you shouldn’t have any issues there.
Installing a dedicated Arma 3 server with SteamCMD
Creating a dedicated Arma 3 server on Windows is much the same as any Steam game. We’ll be utilizing a tool called SteamCMD, which you can download here. While it downloads, create a dedicated folder for your server. We’re going to place ours at ‘e:\Armaserver’ for convenience.
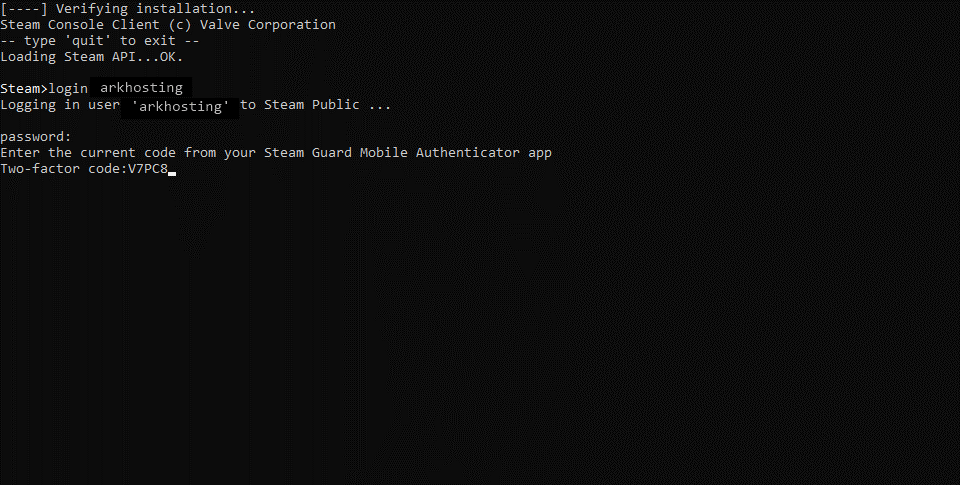
Once SteamCMD has downloaded, extract it to its own dedicated folder. After running it with an administrator, it will install updates before presenting you with a Steam> prompt. We recommend that you create a new Steam account for hosting at this point.
Type the following:
login <steamusername>
Enter your password and any verification code.
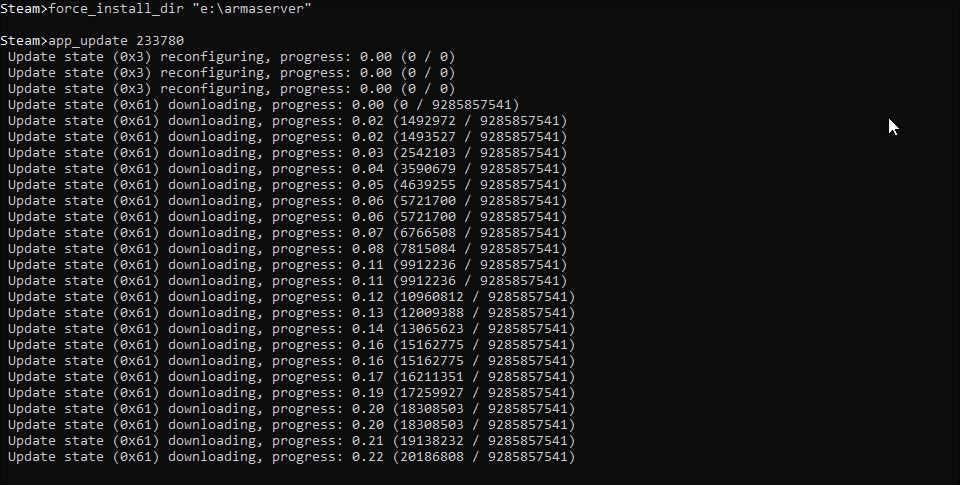
force_install_dir “e\:Armaserver”
app_update 233780 validate
With the server now installed, we can begin the configuration process. The easiest method is currently a tool called Tophe’s Arma Dedicated Server Tool (TADST). After downloading TADST, extract it to the folder that contains your Arma3server.exe.
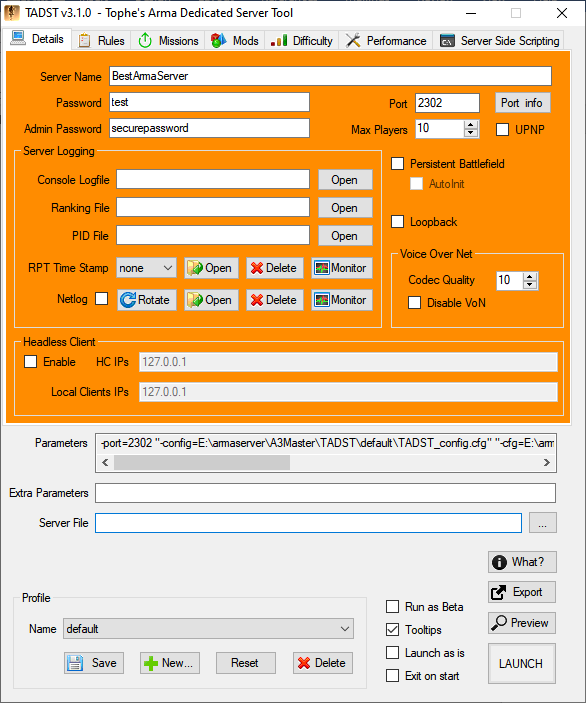
After launching TADST, you’ll be presented with various options, including a server name, password, and root password. It’s very important that your root password is a secure one or attackers could use it to gain control of your server. Here you can also select the max number of players.
Next, navigate to the ‘Server File’ field, and hit the three dots to point TADST to your Arma3server binary. In our case, this is “E:\Armaserver\A3Master\Arma3server.exe”.
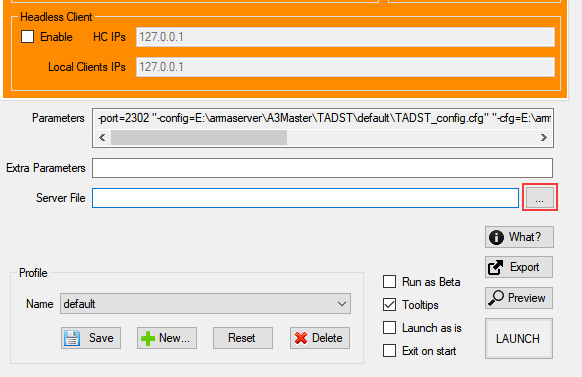
Press ‘Save’ to ensure all these changes are persistent the next time you launch TADST. You can then begin the process of configuring the rules, performance options, missions, and mods of your server. You can find the full details of these in our Arma 3 server configuration guide.
Creating a dedicated Arma 3 server in Linux
Creating an Arma 3 server on Linux is also an option. Most major distros are supported, but we’ll be using Ubuntu in this guide. You may have to modify some commands to suit your flavor of the OS, but the general process is the same.
On Linux, we’ll again be making use of SteamCMD, but this time through a tool called LinuxGSM. This will simplify the install process and make it easier to backup, monitor, and update our server. LinuxGSM is entirely open source, and you can read its code on GitHub.
Before we get started, a few dependencies are required to ensure both LinuxGSM and our Arma server function correctly. On Ubuntu, type:
sudo dpkg --add-architecture i386; sudo apt update; sudo apt install mailutils postfix curl wget file bzip2 gzip unzip bsdmainutils python util-linux ca-certificates binutils bc jq tmux lib32gcc1 libstdc++6 libstdc++6:i386
You can find the relevant dependency commands for Debian, Fedora, and CentOS here.
Now, we should ideally create a new user that’s dedicated to server hosting. This will ensure we start on a fresh slate and that the account won’t be used for anything that will open it to vulnerabilities.
Type sudo adduser Arma3server . Once prompted for a password make sure it’s a secure one. This should be different to your Admin password and Steam password. At this point, you'll be asked for additional user information. You can simply press enter to skip those fields.
You can now download LinuxGSM, to the correct folder and give it permissions with:
su – Arma3server
wget -O linuxgsm.sh https://linuxgsm.sh && chmod +x linuxgsm.sh && bash linuxgsm.sh Arma3server
As you require a Steam account to run an Arma 3 server, it’s necessary to add your login details to the installer config. For security reasons, it’s smart to create a new user just for running the server. Before we can modify our steam credentials, we need to copy the default server settings to our custom config file.
The easiest way to get the correct folder structure is to run the server installer. This will give us “Steam login not set” error, but it’s fine to ignore this for now. Type:
./Arma3server install
cd lgsm/config-lgsm/Arma3server
cat _default.cfg >> Arma3server.cfg
cd
nano lgsm/config-lgsm/Arma3server/Arma3server.cfg
This will create and open our server config file. Change the fields steamuser=”username” and steampass=”password” with the relevant details. Save them with Ctrl + O and Enter, followed by Ctrl + X.
We can now correctly install our server by running ./Arma3serverinstall
To configure your server, type nano lgsm/config-lgsm/Arma3server/Arma3server.cfg once more. You can find a full list of the various parameters and their use cases in our dedicated Arma 3 server configuration guide.
Once you change your username, password, and server name, you can start the server with ./Arma3server start
Port forwarding
Our dedicated Arma 3 server is now running, but networking is a tricky business. To ensure everyone can connect to our server, we must port forward. This lets external connections send and fetch data from our server without running into problems.
On a Linux VPS, you should be able to configure your firewall with:
iptables -P INPUT ACCEPT
iptables -P OUTPUT ACCEPT
iptables -F
iptables -A INPUT -m conntrack --ctstate ESTABLISHED,RELATED -j ACCEPT
iptables -A INPUT -p udp -m multiport –dport 2302:2306 -j ACCEPT
iptables -A INPUT -p tcp -m multiport –dport 2302:2306 -j ACCEPT
iptables -A OUTPUT -p udp -m multiport –dport 2302:2305 -j ACCEPT
iptables -A INPUT -i lo -j ACCEPT
iptables -A INPUT -j DROP
apt-get install iptables-persistent -y
invoke-rc.d iptables-persistent save
If you’re hosting the server on your home network, the easiest way is through your router’s config page. You can find a guide for your router here or with a google search of [Router Name And Model] port forward. Our Arma 3 server requires that ports 2302 to 2306 are open for both TCP and UDP.
Conclusion and Maintenance Tips
With your server up and running, there are a few things to consider to ensure it stays that way. You should be updating regularly, via ./Arma3server update on LinuxGSM, and by running the SteamCMD commands used on the first install for Windows.
As well as the Arma 3 server, you should be updating your host OS whenever a new security patch is released. This will ensure you stay protected against the latest vulnerabilities. It’s also good practice to regularly change your passwords and perform check-ups on your hardware and connection.
You should backup your server regularly, which can be achieved with ./Arma3server backup with LinuxGSM. In Windows, you can manually copy the files, or use Window’s built-in backup service. If you’re hosting on a VPS, your provider should have their own backup utility, which is a useful advantage.
Finally, for general day-to-day management, you’ll want to login to your server as an admin. You can connect and type #login “adminpassword” in chat to do so. You’ll find a full list of admin commands on the bistudio wiki.
Resources & Further Help
With this and our configuration guide, your Arma 3 server should be well on the way. However, there are a number of resources you can refer to for aspects not covered here or if you need community support:
- The Bohemia Interactive Wiki – for a full server installation breakdown, including alternate install methods.
- Linux GSM – for installation commands for various OSes, as well as configuration guides.
- The Bohemia Interactive Forums – for community support and tools.
- Flax’s Arma Server Tool (FAST) – another program to simplify Arma 3 installation
Finally, feel free to email us at [email protected] for any further questions.